Xcode 3.2 SCM with SVN and Complex Project Directories

I started messing around with SCM in Xcode 3.2 using subversion and I had a minor road bump with getting SCM to see modified files outside the project directory. It turns out there's an easy solution, but it wasn't obvious.

I won't go into details on how to setup SVN or SCM for the project, so you can follow this Apple guide for Xcode3: http://developer.apple.com/mac/articles/server/subversionwithxcode3.html

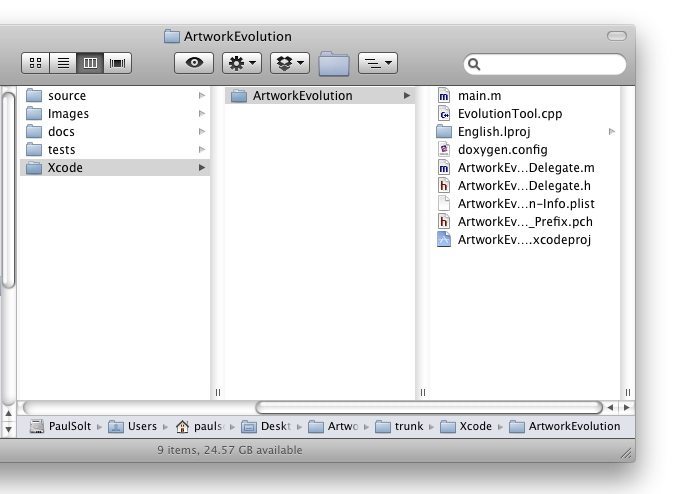
Problem: I have common source that will be shared across different platforms in the source directory, above my Xcode projects directory. The default settings for SCM will look in your projects directory, but I need to look two directories up. (../../)

[caption id="attachment_523" align="aligncenter" width="432" caption="Complex Cross-platform Project Structure"][/caption]
[ad#Link Banner]

We need to modify the project settings for SCM and configure the roots.

  1. Double-click on the project name in the Groups & Files Pane and you'll get the Project Properties window.
  2. [caption id="attachment_531" align="aligncenter" width="456" caption="Project Properties"][/caption]

  3. Click on Configure Roots & SCM in the Project Properties
  4. Set the Root to point above the project directory. In my example, the source folder is located two directories above the Xcode project. I set Roots to "../../"
  5. [caption id="" align="aligncenter" width="392" caption="Project Roots & SCM Settings"][/caption]

  6. Select the SCM repository from one that was setup during the SCM configuration process. I noticed that setting the root will reset the repository, so make sure it doesn't change on you.
  7. [ad#Large Box]

  8. Double-click SCM and we should be able to see any file under SVN version control in the parent directory two levels up. I can see changes to the directories source, images, Xcode, docs, and tests.

SCM File View with All Subdirectories

More Settings

Another helpful setting is to turn on the SCM on the files view.

  • Turn on the SCM on the Editor files view: Right-click on the view bar in the file view on the right side and enable SCM. Now you can see when files have been changed in the normal view outside the SCM view.
  • [caption id="attachment_534" align="alignnone" width="459" caption="Viewing SVN File Changes"][/caption]

  • View Flat Files: If you double-click on SCM in the Groups & Files pane you will get another window. On the bottom left side there is a button. Set it to "Flat" if you like to see just the files that changed without regard to where in the SVN repository they were.
Viewing SCM with the Flat Files view

[ad#Large Box]

Using SCM with SVN 1.6 and Xcode 3.1.2

Version control software is very important to use to keep track of changes. Today I was testing out the Xcode SCM (Software Configuration Management) integrated tools with SVN today and I had a few issues.

1. Xcode is trying to use the wrong dynamic libraries for SVN, if you update your SVN version to 1.6+. Since it's referencing the wrong libraries you will get an error similar to this one:

Error: 155021 (Unsupported working copy format) please get a
newer Subversion client

I've seen this type of error when I upgraded my SVN and tried to use other SCM GUI software. To fix it I googled around and found some useful information at: Blind Genius Weblog

cd /usr/lib
sudo mkdir oldSVN
sudo mv libap*-1.dylib oldSVN
sudo mv libsvn*-1.dylib oldSVN
sudo mv libap*-1.0.dylib oldSVN
sudo mv libsvn*-1.0.dylib oldSVN
$ sudo ln -s /opt/local/lib/libap*-1.0.dylib .
$ sudo ln -s /opt/local/lib/libsvn*-1.0.dylib .
$ sudo ln -s /opt/local/lib/libap*-1.dylib .
$ sudo ln -s /opt/local/lib/libsvn*-1.dylib .

Instead of removing the library files, I moved them into a new directory as backup.

2. Now Xcode can use the correct updated libraries from SVN 1.6+, so I moved on to the next task of adding an existing project to the SVN repository. The tutorial at jms1.net was helpful in refreshing my memory for the SVN commands.

Make a project in Xcode and then use Terminal and execute the commands. If you aren't familar with SVN check out the documentation.

cd LOCAL_PROJECT_PATH
svn mkdir SVN_REPOSITORY_LOCATION/PROJECT_NAME
svn co SVN_REPOSITORY_LOCATION/PROJECT_NAME .
svn add *
svn revert --recursive build
svn ps svn:ignore build .
svn ci

The commands create a folder in your SVN repository. Next it checks out the remote repository folder into the local project folder and add all of the project files. Once the files are "added" you'll want to remove the build directory and ignore it from your SVN repository. Lastly it'll commit the changes and you're project is in the repository.

3. The project is in the repository and Xcode is using the latest version of SVN. You can use the SCM tools in Xcode to manage the project.

[ad#Large Box]

Macbook Pro + Windows + Dual Monitors = Painful

I didn't think it would be so hard to just get my taskbar and icons on a second monitor using Windows on my Macbook Pro. It doesn't seem like a whole lot of people run Windows on the Mac, so there isn't a whole lot of resources if you get stuck. It takes a lot of digging to find the real answers. Turns out the display drivers from NVIDIA/Apple for Windows don't support making an external monitor as a primary monitor. It only gives the option of making the laptop display primary. This limitation is very painful and kept me up for hours/days searching for registry hacks, hacked drivers, and more. Here's what I found that didn't work and what did:

Registry hack: Fail = True;

The Apple nVidia driver INF file is missing 2 registry entries for using external display as primary in a dual display setup. The keys you need are:

HKEY_LOCAL_MACHINE\SYSTEM\CurrentControlSet\Control\Video{C0FF928A-9E27-40AE-845F-E0D8A8E03216}\0000 "DualViewAllow2ndViewAsPrimary"=dword:00000001 "DualViewMobile"=dword:00000002

Do not import these lines directly. Do them manually via REGEDIT. The hardware ID (C0FF928A-9E27-40AE-845F-E0D8A8E03216) is different in every system, so put the keys in the correct video hardware key in your system.

[ad#Large Box]

Turns out Windows didn't like the registry hack and I couldn't get anything up on the display, even though I was able to get the primary display option on my external monitor with the hack. I also had to guess which hardware ID to use, since there were 5 hardware key options. I tried the logical one with a lot of registry entries for display modes/settings under the 0000 folder.

Updated Supported Drivers: Fail = True; Again I began searching for something else, but there's not a whole lot of information on this topic. I contemplated installing a different set of drivers for Windows, but the one I found referenced from Apples discussion page was older than the current driver I have now. There was a recent update for Boot Camp to 2.1 this summer which looks like it included new NVIDIA drivers.

Updated Un-supported Drivers: Fail = True; Not having a real solution from Apple I looked into the drivers from http://www.laptopvideo2go.com/ however I found a few posts that said it didn't help or wasn't performing as well. I'm doing game development (XNA) on my laptop and I don't want to ruin a working system or introduce incompatibilities; so stability is very important for me at the moment. I decided to try and avoid non-standard drivers and look for another alternative.

nView Desktop Manager: Success = True; nView Desktop Manager Here is the solution that I had been looking for; it was something I found last year, but forgot about since I didn't have dual monitors. To enable it you'll need to go to 'Control Panel' -> 'NVIDIA nView Desktop Manager' -> click 'Enable'. Now you should see the nView Properties option when you right click on your desktop and you've just opened a whole can of worms for customizing your desktop.

[ad#Link Banner]

  • You can move your Taskbar/icons to your second display by the 'Tools' tab and 'Move to Display' button.
  • Set multiple desktop backgrounds using the 'Desktops' tab and the Properties button. There's a check box to 'Allow different backgrounds per display'
  • Hotkeys to perform various tasks related to windows management
  • Profiles to save/load settings when switching between a dual monitor/single display setup.
  • Transparency effects on window drags and more...

Edit: As much as I'd like this solution to work all the time; it still has bugs. Dialogs on different applications appear on the laptop display and the software can sometimes be glitchy for the development work I'm doing. WinForms development with Visual Studio 2005 Express seems to bug it out the most and causes Icons to flicker. I'm not sure if that flicker is because of the dual monitor setup or from WinForm editing in VS 2005.

[ad#Large Box]

Life Changing Event

My life has changed thanks to Joe. Suddenly my tab key is more useful on my Macbook. I can now tab through my dialog option buttons. There's an obscure setting in the System Preferences > Keyboard and Mouse > Keyboard Shortcuts > Full Keyboard Access (set to All Controls). Or you can press ctrl-F7.

This makes so many things much easier to do with out having to constantly use the mouse to move to a button and click.

Love it!