Making NSApplicationDelegate and NSDocument Play Together in OSX 10.8

I found it difficult to setup a NSApplicationDelegate for a Document-based Mac 10.8 (Mountain Lion) application (NSDocument) using ARC.

There's a lot of handy app specific methods in the delegate protocol that you'll most likely want in a new Mac app.  However, the project template (Xcode 4.4) does not include the ApplicationDelegate class. This missing puzzle piece meant I had to figure out how to configure it correctly with Xcode's Interface Builder.

Problem with NSApplicationDelegate

I tried adding an Object as my ApplicationDelegate in my PSDocument.xib file. However, that led to random crashing (EXC_BAD_ACCESS objc_msgSend_vtable5) when I closed windows from my app.

1. The reason it crashed is that the document window was deallocated, and the PSApplicationDelegate object was attached to it. This caused the NSApplication to invoke methods on a previously deallocated object. (i.e. PSApplicationDelegate)

2. Zombies to the rescue. See the screenshot on how to enable zombies if you're new to Xcode. Using zombies I was able to figure out a general idea of what happened.

Zombie Objects

Solution

Add the PSApplicationDelegate object to your MainMenu.xib file. It'll persist until you exit your app, rather than your document windows.

1. Drag the Object (blue-box) from the Object Library to your side panel in Xcode's Interface Builder.

2. Create the NSObject class called PSApplicationDelegate.h/m

3. Conform to the NSApplicationDelegate protocol

#import <Cocoa/Cocoa.h>
 
@interface PSApplicationDelegate : NSObject<NSApplicationDelegate>
 
@end

4. Rename the Object (blue-box) to PSApplicationDelegate

Custom Object in Xcode 4 4 Interface Builder

5. Control-click or right-click and drag from the File's Owner (NSApplication) to the new PSApplicationDelegate object (blue-box)

6. Select delegate.

NSApplicationDelegate Example for Document-based Mac OSX apps


Now you're golden and use any of the protocol methods from NSApplicationDelegate.

#import "PSApplicationDelegate.h"
 
@implementation PSApplicationDelegate
 
// Delegate methods
- (void)applicationDidFinishLaunching:(NSNotification *)notification {
    NSLog(@"Started app");
}
 
 
@end

Creating NSDocument using Folder Bundles and UTI Identifiers

I've been working on a Lion NSDocument-based application that deals with multiple data files. I decided to work with the NSFileWrapper and treat a folder like a single file. (i.e. Xcode Project Files .xcodeproj) I wanted to get an icon to display for the folder and to have it appear as a  single file on Finder. In the NSDocument you need to implement the two save/load methods to get started and then you need to edit your Info.plist file.

- (NSFileWrapper *)fileWrapperOfType:(NSString *)typeName
                               error:(NSError *__autoreleasing *)outError {
    // Save data here ...
}

- (BOOL)readFromFileWrapper:(NSFileWrapper *)fileWrapper
                     ofType:(NSString *)typeName
                      error:(NSError *__autoreleasing *)outError {
    // Load data here ...
}

Problems

There's a few gotchas with the .plist file. In order to create a NSDocument using Folder Bundles you'll need to set the UTI Identifier for the Document  Type and the Exported/Imported UTIs. You'll find this setting on the Info page for your Xcode Target.


  1. My App doesn't load saved bundles (NSFileWrapper), instead it just looks inside the folder.Can t Load Data
  2. I tried to undo the Export UTI by deleting it and remove the Identifier, but that doesn't help.
  3. By deleting the Identifier I can't load "New documents".

Solutions

There are two solutions, the second one is more robust, but the first will get you back to when it was working.

Solution 1: Revert back to Xcode template defaults

  1. Remove all Exported UTIs
  2. Open your App .plist file and remove the LSItemContentTypes from your App .plist file. You can't see it in the Target -> Info page.
    1. NOTE: if you don't delete an empty LSItemContentTypes array, then you won't be able to open New files.
    2. If LSITemContentTypes is defined, it'll ignore the "Bundle" checkbox (LSTypeIsPackage) See the Apple docs.
  3. Make sure "Bundle" is checked on the Document Types on your Target's Info page, or (LSTypeIsPackage on .plist file)
    1. This option is magic and auto generates a Identifier for you. (check your save file with "mdls" on the Terminal)
  4. Don't use an Identifier if you check the Bundle option (Document is distributed as a bundle)
  5. Clean the Xcode project


Solution 2: Use the package UTI

You'll need to add the correct LSItemContentTypes found in Apple's documentation. I took a look at the Xcode project file with the Terminal utility "mdls" (See sample output below)

  1. Set a unique identifier (Reverse DNS name) com.Your_Company_Name.Project_Name
    1. It needs to match theDocument Type and Exported UTIs
  2. For a bundle, you'll need to set the "Conforms To" for the Exported UTIs to "com.apple.package"
    1. Apple Docs: "A package (that is, a directory presented to the user as a file)"
  3. I noticed Xcode project files also include, public.composite-content
    1. Apple Docs:  "Base type for mixed content. For example, a PDF file contains both text and special formatting data"
  4. NOTE: If you mistype com.apple.package, or leave it out, your file folder will be treated like a public.folder, and you'll get folder behavior.
  5. Clean the Xcode project

Com apple package

Working Icon and Bundle File

If all goes well you'll now see the Icon (icns) file that you created in the Open dialog and the folder will appear to be a bundle.

OpenDialogWorks

Using MDLS to inspect your files

The only way it works as a bundle is if the "com.apple.package" ContentType is listed, otherwise something is wrong. Check your save files with the "mdls" command.

mdls MathAndArt.xcodeproj/

Screen Shot 2012 02 02 at 7 57 23 PM

GLUT Object Oriented Framework on Github

In 2009 I took a Computer Animation course at @RIT I created an object-oriented C++ wrapper for GLUT. The idea was to create a set of classes that could be reused for each of the separate project submissions. The main class wraps around the GLUT C-style functions and provides a class that can be inherited from, to provide application specific functionality. The idea was to make the boiler plate code disappear and make it easier for novice programmers to get an animated graphics window in as few lines as possible. Only four lines of code are needed to get the window running at 60 frames per second. You can subclass the framework and implement your own OpenGL animation or game project.

Edit (8/22/10): You don't need to use pointers, I've updated the code example with working code.

// main.cpp
#include "GlutFramework.h"
using namespace glutFramework;
int main(int argc, char *argv[]) {
	GlutFramework framework;
	framework.startFramework(argc, argv);
        return 0;
}

[ad#Large Box]

The code uses a cross-platform (Windows/Mac tested) timer to create a constant frame-rate, which is necessary for animation projects. It's under the MIT License, so feel free to use it as you see fit. http://github.com/PaulSolt/GLUT-Object-Oriented-Framework

An Xcode 3.1 and Visual Studio 2010 project is hosted on github to support Mac and Windows. There is no setup on the Mac, but Windows users will need to configure GLUT. I plan on posted tutorials on how to get setup on both platforms. For now, look at the resources section below.

[caption id="attachment_617" align="aligncenter" width="504" caption="Animated teapot"][/caption]

Resources:

[ad#Large Box]

Player/Stage, MacPorts, and iPhone

Today I worked on setting up Player/Stage on my Macbook Pro with Leopard 10.5.6 and I ran into a few issues. I was using Macports 1.710 and I was attempting to install player-stage-player (2.03 2.1.2) and player-stage-stage (2.03 2.1.1) following a short guide at http://bentham.k2.t.u-tokyo.ac.jp/notebook/?p=247

If it's your first time using macports it can take a long time. I waited 2+ hours to download/build/install dependencies

I used the command:

$ sudo port install playerstage-player playerstage-stage

However it errored out at the end with the message:

$ sudo port install playerstage-player playerstage-stage
--->  Building playerstage-player
Error: Target org.macports.build returned: shell command " cd "/opt/local/var/macports/build/_opt_local_var_macports_sources_rsync.macports.org_release_ports_science_playerstage-player/work/player-2.0.4" && make all " returned error 2
Command output: building '_playerc' extension
swigging playerc.i to playerc_wrap.c
swig -python -o playerc_wrap.c playerc.i
playerc.i:44: Warning(124): Specifying the language name in %typemap is deprecated - use #ifdef SWIG instead.
playerc.i:82: Warning(124): Specifying the language name in %typemap is deprecated - use #ifdef SWIG instead.
playerc.i:121: Warning(124): Specifying the language name in %typemap is deprecated - use #ifdef SWIG instead.
playerc.i:127: Warning(124): Specifying the language name in %typemap is deprecated - use #ifdef SWIG instead.
gcc -fno-strict-aliasing -Wno-long-double -no-cpp-precomp -mno-fused-madd -fno-common -dynamic -DNDEBUG -g -Os -Wall -Wstrict-prototypes -DMACOSX -I/usr/include/ffi -DENABLE_DTRACE -arch i386 -arch ppc -pipe -I./../.. -I../../../.. -I/System/Library/Frameworks/Python.framework/Versions/2.5/include/python2.5 -c playerc_wrap.c -o build/temp.macosx-10.5-i386-2.5/playerc_wrap.o
playerc_wrap.c: In function '_wrap_playerc_mclient_client_set':
playerc_wrap.c:40301: warning: assignment from incompatible pointer type
playerc_wrap.c: In function '_wrap_playerc_mclient_addclient':
playerc_wrap.c:40504: warning: passing argument 2 of 'playerc_mclient_addclient' from incompatible pointer type
gcc -Wl,-F. -bundle -undefined dynamic_lookup -arch i386 -arch ppc build/temp.macosx-10.5-i386-2.5/playerc_wrap.o -L./../../.libs -L../../../../libplayerxdr/.libs -L../../../../libplayercore/.libs -L../../../../libplayerjpeg/.libs -lplayerxdr -lplayerc -lplayerjpeg -ljpeg -lplayererror -o build/lib.macosx-10.5-i386-2.5/_playerc.so
ld: library not found for -ljpeg
collect2: ld returned 1 exit status
ld: library not found for -ljpeg
collect2: ld returned 1 exit status
lipo: can't open input file: /var/tmp//ccI9TvVp.out
(No such file or directory)
error: command 'gcc' failed with exit status 1
make[6]: *** [pythonbuild] Error 1
make[5]: *** [all] Error 2
make[4]: *** [all-recursive] Error 1
make[3]: *** [all-recursive] Error 1
make[2]: *** [all-recursive] Error 1
make[1]: *** [all-recursive] Error 1
make: *** [all] Error 2

Error: Status 1 encountered during processing.

[ad# Link Banner]

So I searched around the MacPorts website and I came across the ticket #18891, which basically said to run the following command to change the version of python being used from 3.0 to 2.5.

$ sudo port install python_select && sudo python_select python25
Skipping org.macports.activate (python_select +darwin_9) since this
port is already active
--->  Cleaning python_select
Selecting version "python25" for python

Following that command I was able to finish installing Player/Stage via MacPorts by using the orginal port command.

$ sudo port install playerstage-player playerstage-stage
--->  Building playerstage-player
--->  Staging playerstage-player into destroot
--->  Installing playerstage-player @2.0.4_2
--->  Activating playerstage-player @2.0.4_2
--->  Cleaning playerstage-player
--->  Fetching playerstage-stage
--->  Attempting to fetch stage-2.0.3.tar.bz2 from
http://voxel.dl.sourceforge.net/playerstage
--->  Verifying checksum(s) for playerstage-stage
--->  Extracting playerstage-stage
--->  Configuring playerstage-stage
--->  Building playerstage-stage
--->  Staging playerstage-stage into destroot
--->  Installing playerstage-stage @2.0.3_0
--->  Activating playerstage-stage @2.0.3_0
--->  Cleaning playerstage-stage

I tried to use player stage from MacPorts.

$ player /opt/local/var/macports/software/playerstage-stage\
/*/opt/local/share/stage/worlds/simple.cfg

And I received the error:

rr: unable to open color database /usr/X11R6/lib/X11/rgb.txt
 : No such file or directory (stage.c stg_lookup_color)

Following the advice from http://bentham.k2.t.u-tokyo.ac.jp/notebook/?cat=5 I added the following link.

$ sudo ln -s /usr/X11/share/X11/rgb.txt /usr/X11R6/lib/X11/rgb.txt

Now I am able to create a player server and connect with a client with the commands:

$ player /opt/local/var/macports/software/playerstage-stage\
/*/opt/local/share/stage/worlds/simple.cfg

/opt/local/var/macports/software/playerstage-player\
/*/opt/local/share/player/examples/libplayerc++/laserobstacleavoid

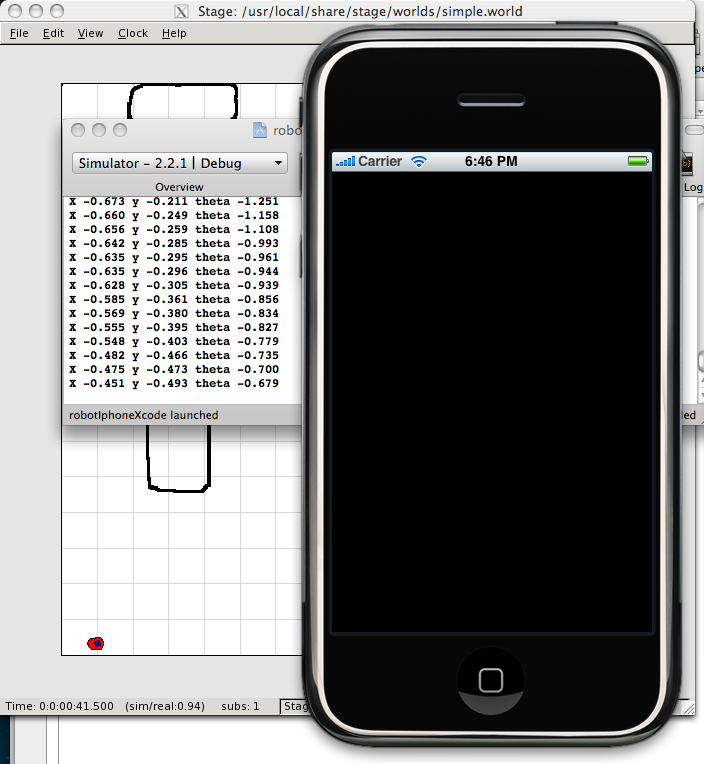
With the ability to run player/stage I will post again on my progress as I use an iPhone to run the Player client, rather than my Macbook Pro.

[caption id="attachment_209" align="alignleft" width="443" caption="Player client running on iPhone with Player/Stage."]Player client running on iPhone with Player/Stage.[/caption]
[ad#Large Box]